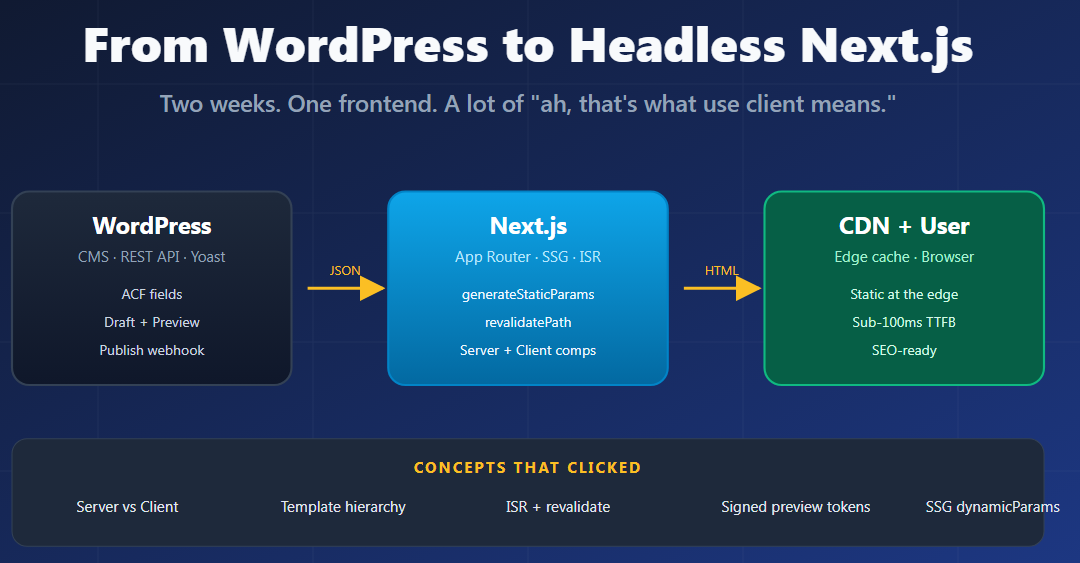

Two weeks ago I was a WordPress developer who hadn’t seriously touched React since the COVID lockdown days. Then the task landed on my desk: rebuild existing live WordPress site as a headless Next.js frontend, keep WordPress as the CMS.
As a WordPress developer, I was used to PHP templates, ACF layouts, and traditional theme structures. But this time, the goal was different. No starter knowledge of the App Router. No production Next.js experience. Only a working WP install with ACF fields and Yoast SEO, and Google.
This post is the honest version of what those two weeks looked like the confused start, the moment things clicked, the security puzzles, and the concepts I wish someone had handed me as a single map on day one. If you are a WordPress developer staring at the same task, this is the article I wanted to find when I typed “headless wp with next.js” into the search bar.
Discovering the Stack: The first Google search
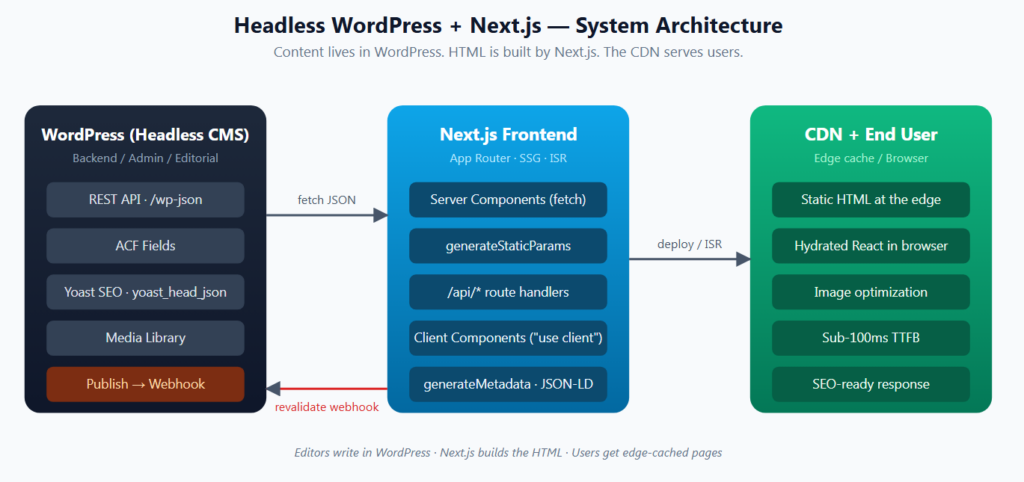
Like most developers, I started with Google, a single query: “headless wp with next.js”. The top results were a GitHub boilerplate and the official Vercel blog post on building a headless WordPress site with Next.js. I read the blog, cloned the repo, and opened it in VS Code.
What I saw was unexpectedly nostalgic: an app/ folder, an api/ folder, components/, tsx/ts everywhere. It felt like React all over again. It reminded me of my early React days during COVID.
Setting Up the Project
I did the fastest possible thing first: I started the dev server, hit the WP REST API endpoint /wp-json/wp/v2/posts, and rendered the JSON on a page. That was all i needed to do to confirm that the connection functioned correctly. Coming from years of WordPress development where i had used the REST API for plugin work, this step was straightforward.
Then I asked an AI agent to create a clean scaffold project directory, including lib/, utils/, data/, a proper README and now I had a structured skeleton instead of an empty boilerplate. Now the real journey began.
[ WordPress (ACF + REST API) ]
            ↓
     [ Next.js App Router ]
            ↓
   [ Page Builder System ]
            ↓
   [ UI Components Layer ]
At that point, the project started feeling “real”.
Understanding Next.js Routing
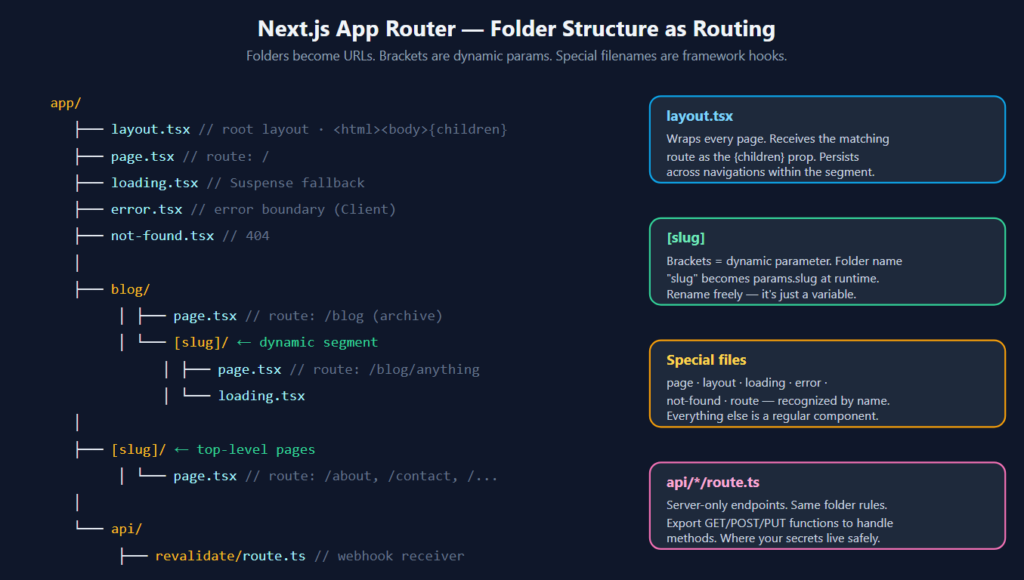
Initially, I went through the folder structure to know about the things generated by AI Agent. I started connecting everything without fully grasping the framework. I play around it and got to know about which file is responsible for rendering the content in the page. When I saw the folder name [slug] I assumed it was some Next.js magic string.
So after struggling, I paused, accessed the Next.js documentation, and studied it thoroughly for several hours. I have to say, the documentation for Next.js is quite good, clear and easy to understand. Finally i realized, Next.js uses File-Based Routing. Like app/[slug]/page.tsx means: Any URL like /about or /services is dynamically handled. So, if i named it [catfish], i would get params.catfish. The framework just reads the brackets.
In the App Router, folders are routes. Files inside folders have special meanings:
| File | What it does |
|---|---|
page.tsx | Makes the folder a publicly routable URL |
layout.tsx | Wraps every page inside this folder (and its children) with persistent UI |
loading.tsx | Auto-renders during data fetching as a Suspense fallback |
error.tsx | Catches errors thrown anywhere in the route segment |
not-found.tsx | Renders when notFound() is called or a route does not match |
[slug]/ | A dynamic segment the bracket name becomes a parameter |
The other piece that i noticed was: {children} in layout.tsx. A layout is a React component that receives whatever route is rendering inside it as the children prop. The same primitive every React developer already knows, just applied at the routing level. Coming from WordPress field, the closest analog is how header.php and footer.php wrap the_content() except here Next.js handles it for you and gives you full control from <html> to </html>.
The “use client” trap (and the hydration error that taught me what it meant)
I was scrolling through components and kept seeing "use client" at the top of files. My brain registered it as a string, like a comment or a no-op, and I moved on.
Then I started building interactive components, a search input, a mobile nav toggle and got hit with the hydration error:
A tree hydrated but some attributes of the server rendered HTML didn't match the client properties.That error sent me back to the docs, and finally the architecture clicked. Here is the short version that would have saved me half a day:
In Next.js App Router:
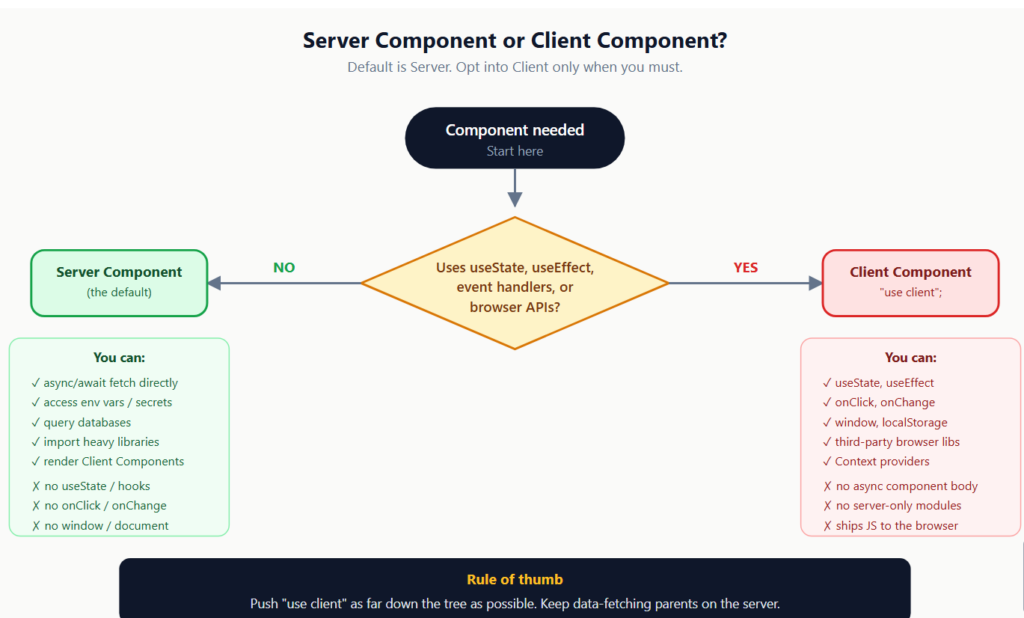
- Every Component is a Server Components by default
- Client Components must be explicitly marked
Key Difference
| Server Component | Client Component |
|---|---|
| Runs on server | Runs in browser |
| No hooks | Supports hooks |
| Faster | Interactive |
Server Components render on the server, produce HTML, and ship zero JavaScript for that component to the browser. They cannot use:
useState,useEffect,useRef, or any React hook- Browser APIs (
window,document,localStorage) - Event handlers (
onClick,onChange)
To make a component into being a Client Component, you add "use client"; as the very first line of the file. That component (and everything imported into it) now become client components and ships JavaScript to the browser, runs hooks, and handles interactivity. Next.js still pre-renders it on the server first, then hydrates it in the browser, meaning React attaches event listeners to the existing HTML instead of re-rendering it from scratch.
A hydration error happens when the server HTML and the first client render don’t match. The usual culprits:
- Using
new Date()orMath.random()during render (server time ≠ client time) - Reading
windoworlocalStoragedirectly in component body - Conditional rendering based on
typeof window !== 'undefined' - Marking a layout
"use client"when it also exportsmetadata(metadata requires a Server Component)
This was a turning point in understanding Next.js.
The rule I now follow: start every component as a Server Component. Only add "use client" when you genuinely need state, effects, or event handlers and push that boundary as far down the tree as possible. A Client Component can still receive Server Components as children (passed via props), so you can keep the heavy data-fetching parents on the server even when wrapped in an interactive shell.
Layout in NextJS
Another key concept:
export default function Layout({ children }) {
  return <div>{children}</div>
}
Now I understood: {children} is where nested pages are injected.
This made the entire routing system feel extremely clean compared to WordPress templates.
Mapping WordPress to Next.js: where the template hierarchy paid off
My site uses ACF heavily for page content. The next challenge was: How do I map WordPress pages into Next.js routes?
This is where my WordPress background turned into a superpower. The WordPress Template Hierarchy, the thing I had lived inside for years maps almost one-to-one onto the App Router’s folder structure.
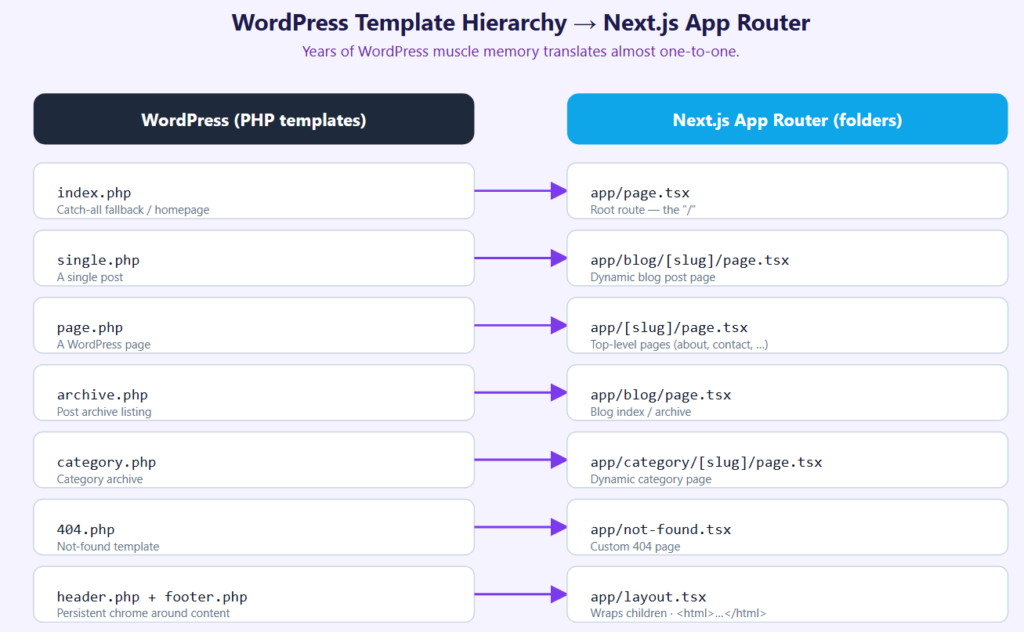
Working with Next.js helped me understand the WordPress template hierarchy more better and make my concept crystal clear. The basic idea is the same: the most specific template wins, and there is a fallback chain. Next.js represents this with folder nesting instead of using a filename lookup table.
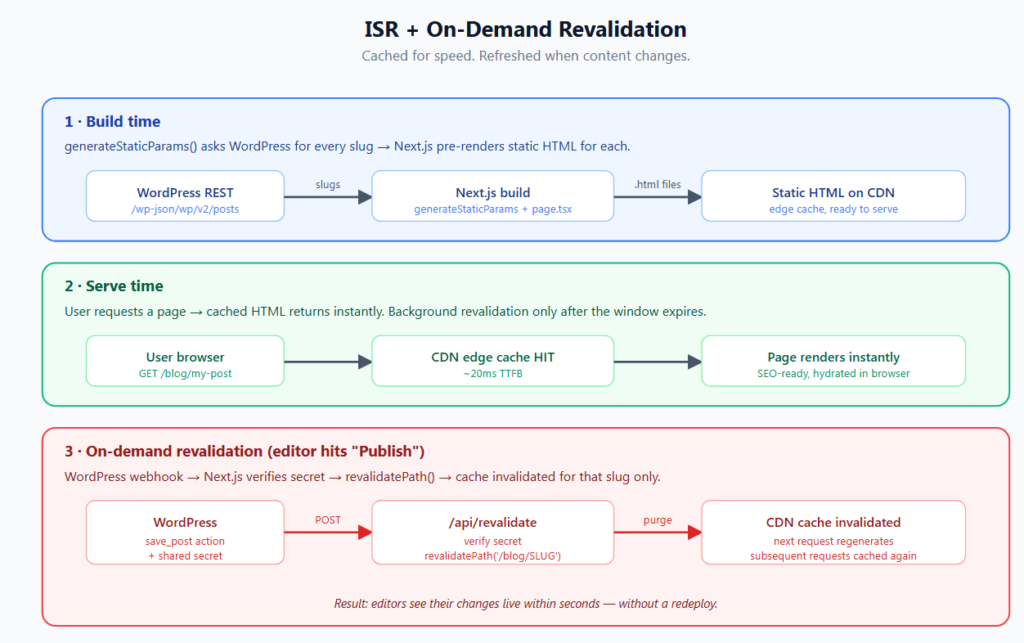
For content I fetched all pages and posts at build time using generateStaticParams, then let dynamic content fill in on-demand (more on that below in the SSG section).
ISR: the concept that made the whole thing make sense
While building, I discovered:
export const revalidate = 3600;This introduced me to ISR. At first confusing, but then clear: Pages are static but automatically refresh in background.
Static sites are really fast. But editors want their changes to appear immediately, not just during the next deploy. Incremental Static Regeneration (ISR) makes this possible.
Here’s how it works:
At build time, Next.js creates static HTML for your pages. You set a revalidate window, like 60 seconds. Next.js serves the cached HTML, and after the window expires, it regenerates the page in the background on the next request (not after every 60 seconds like cron job). Users always receive a fast cached response, and the cache updates itself.
// app/blog/[slug]/page.tsx
export const revalidate = 60; // background refresh after 60s
export default async function Post({ params }: { params: Promise<{ slug: string }> }) {
const { slug } = await params;
const post = await getPostBySlug(slug);
return ;
}
But time-based regeneration is not enough when an editor hits Publish and wants the new content live in seconds, not minutes. That’s where on-demand revalidation comes in: WordPress sends a webhook to a Next.js route handler, which calls revalidatePath() or revalidateTag() to invalidate exactly the affected pages.
Building the API layer: proxies, secrets, and security
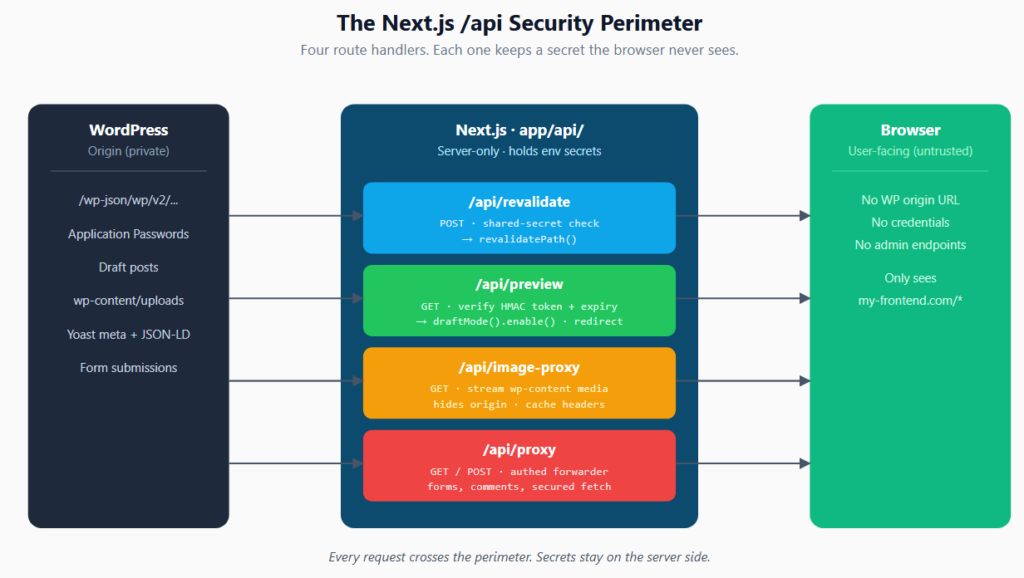
The Next.js app/api/ folder became the security perimeter of the whole project. I ended up with four route handlers, each with a distinct job:
- API proxy layer
- Image proxy
- Preview API
- Revalidation API
This helped: Keep WordPress secure and avoid direct exposure to frontend
1. /api/revalidate: fired by WordPress on publish
WordPress hits this endpoint with a shared secret and the slug of the changed post. Next.js verifies the secret and revalidates only the affected paths.
ts
// app/api/revalidate/route.ts
import { revalidatePath } from 'next/cache';
import { NextResponse } from 'next/server';

export async function POST(request: Request) {
  const { secret, slug, type } = await request.json();

  if (secret !== process.env.REVALIDATE_SECRET) {
    return NextResponse.json({ ok: false }, { status: 401 });
  }

  if (type === 'post') revalidatePath(`/blog/${slug}`);
  if (type === 'page') revalidatePath(`/${slug}`);
  revalidatePath('/'); // homepage list

  return NextResponse.json({ ok: true, revalidated: slug });
}
2. /api/preview: secured draft viewing
This was the hard one. WordPress admins need to see unpublished drafts inside the Next.js frontend, but the preview URL absolutely cannot be guessable or replayable.
I implemented:
- Token-based authentication
- Signed URLs
- Secure WP → Next.js communication
- Default Nextjs Draft mode cookie along with custom one too.
- From WordPress, generate an HMAC-signed token containing the post ID, and a short expiry timestamp.
- From WP admin made the POST request to
https://my-frontend.com/api/previewwith formData. - The Next.js handler verifies the HMAC signature, checks the expiry, and only then calls
draftMode().enable()and redirects to the post. - Any draft fetch inside the app checks for
draftMode().isEnabledand includes the admin’s auth header to hit WP with the draft post.
This helped ensure: Only authorized WordPress admins can preview drafts.
This is why WordPress’s default preview URLs are so long and ugly, those query strings are nonces, and a nonce is exactly the same primitive: a short-lived, single-use, signed token. Once I understood headless preview, the WP nonce system suddenly made sense.
3. /api/image-proxy: image optimization without exposing WP
Next.js’s <Image> component needs allowlisted domains. Instead of broadcasting my WP origin URL in every <img> tag, I proxy through /api/image-proxy?src=... so visitors never see the WordPress hostname.
4. /api/proxy: generic secured request relay
For anything else (forms, comment submissions, secured GETs that need server-only auth headers), I built a generic proxy that forwards the request to WordPress with the right credentials and never exposes them to the browser.
Rendering System (Page Builder)
I built a page builder system: <PageBuilder page={page} sectionData={sectionData} />
This dynamically renders:
- Hero sections
- Pricing blocks
- Testimonials
- Case studies
- Videos
SEO: keeping Yoast happy in a headless world
This was non-negotiable. The site’s organic traffic is built on years of Yoast configuration: title templates, meta descriptions, Open Graph cards, and most importantly, structured data (JSON-LD) for articles and breadcrumbs.
Yoast exposes everything through the REST API in a field called yoast_head_json. That object contains the title, description, canonical, OG tags, Twitter card, and the full JSON-LD @graph. I map it into Next.js’s generateMetadata function something like:
// app/blog/[slug]/page.tsx
export async function generateMetadata({ params }): Promise<Metadata> {
  const { slug } = await params;
  const post = await getPostBySlug(slug);
  const y = post.yoast_head_json;

  return {
    title: y.title,
    description: y.description,
    openGraph: {
      title: y.og_title,
      description: y.og_description,
      images: y.og_image,
      type: 'article',
      publishedTime: y.article_published_time,
    },
    twitter: { card: y.twitter_card, title: y.twitter_title },
    alternates: { canonical: y.canonical },
  };
}
For JSON-LD, I render Yoast’s @graph schema directly in the page body as a <script type="application/ld+json"> tag. Google reads it from anywhere in the document, so it doesn’t need to live in <head>. After i deploy my app in the staging environment, I need to run every key page through Google’s Rich Results Test. This will help me to verify whether every schema my old WP frontend emitted, the headless frontend now emits identically.
Loading and error boundaries: free wins
Two files I underestimated until I used them:
loading.tsx: Next.js wraps the segment in a React<Suspense>boundary automatically. Whatever you put inloading.tsxshows while async data resolves. No state, no flags, noisLoadingprop drilling.error.tsx: must be a Client Component (it usesreset()to retry). Catches anything thrown in the segment and renders a fallback without crashing the whole app.
For nested routes, say /services/[category]/[slug], each segment can have its own loading and error boundary.
SSG with generateStaticParams and dynamicParams: true
SSG is another important concept i was missing. I learned about it during the build process. I came to know about generateStaticParams function. It tells Next.js, at build time, which dynamic route paths to pre-render as static HTML.
// app/blog/[slug]/page.tsx
export async function generateStaticParams() {
  const posts = await getAllPostSlugs();
  return posts.map((p) => ({ slug: p.slug }));
}

export const dynamicParams = true; // any other slug is generated on-demand
The dynamicParams = true is the another things to understand. With it set to true, paths returned by generateStaticParams get pre-built at deploy time (fast, cached), but any new post published after the build (one that was not in the list yet) still renders on first request and then caches itself. Set it to false instead, and any unlisted slug returns a 404 which is what you want for fully closed-set routes, but never for a content site where editors are constantly publishing.
This combination of generateStaticParams + dynamicParams: true + revalidate + on-demand revalidation is the best combination i found during these two weeks. Old content is instant and cached. New content is live on publish. Editors are happy. CDNs are happy.
TypeScript: pay the tax, get the receipt
I will not pretend this was painless. Migrating from PHP/JS to a strict TypeScript codebase meant dozens of Property 'x' does not exist on type 'unknown' errors during the first build. I leaned on:
- A central
types/wordpress.tsfile with hand-typed interfaces forPost,Page,ACF,Yoast,Media. - Generic helpers like
wordpressFetch<T>(endpoint, params)that propagate the type to the caller. as constand discriminated unions for ACF flexible content blocks (each block has aacf_fc_layoutkey perfect discriminator).
The build was painful that made me quite frustrated. The post-build experience is dramatically better than the equivalent untyped codebase. You learn quickly to treat the typechecker as a free reviewer.
React hooks I actually used (and where)
Once I started writing Client Components, the standard hook set came back fast:
useState— local interactive state (search input value, accordion open/closed).useEffect— initialize browser-only things (analytics, form submission) after mount.useMemo— memoize expensive derived values (filtering a large product list against a search query).useCallback— stabilize callback identities passed to memoized children.useContext— This helped me to prevent props drilling.
The discipline I learned: don’t reach for useEffect to fetch data in App Router land. Data fetching belongs in Server Components, where you can just await it. useEffect is for genuine side effects DOM, subscriptions, third-party scripts.
What I wish I had known on day one
If I could write a single index card and hand it to myself two weeks ago:
- Server Components are the default.
"use client"is the optional. Push the boundary as far down as possible. - Folders are routes. Brackets are parameters. Special filenames are special only inside the App Router.
- ISR + on-demand revalidatio/n is the real headless WP. Build static, refresh on publish.
- Do not trust the network. Build a proxy layer. Image proxy, preview signing, secret-gated revalidate.
yoast_head_jsonis your SEO migration path. Do not try to reinvent metadata.generateStaticParams+dynamicParams: trueis the SSG pattern for content sites.- TypeScript pain is front-loaded. The payoff is real.
Biggest Learnings
- WordPress is no longer the frontend: It is purely a content engine.
- Next.js handles everything visually: Routing, rendering, caching, all built-in.
- ISR is a game changer: It bridges static and dynamic worlds.
- SSG make the site really fast.
What’s next
I have completed the development work, and now i am doing the review from my side. I am updating the code that i wrote first and the latest one with the latest version. Also i did one level review from the AI agent and now fixing the issue raised by it. Also i am now waiting for the expert review document, which i am genuinely most excited about.
If you’re a WordPress developer about to start the same journey, it is worth it. The shift from “WordPress generates HTML” to “WordPress is a typed JSON API” is larger than it seems, but every other part of the modern frontend ecosystem opens up after you make that change.
Conclusion
I am now at a stage where I can confidently design and build a full headless WordPress + Next.js architecture from scratch.
But I also know: There is still a lot more to learn and refine. And that is what makes this journey exciting.